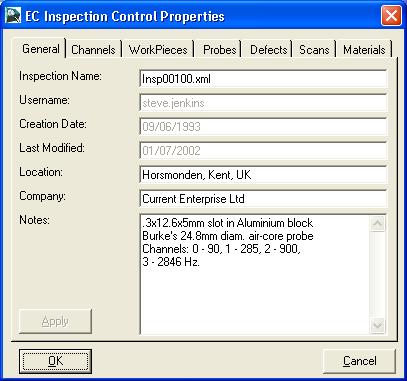
EcInspection control general tab properties
When the EcInspection control's property page opens up it appears as shown in the Figure below.
EcInspection control general tab properties
Use the General tab to edit the Inspection header information. The information
contained in the header is shown in the Figure. The dimmed information is maintained
by the control itself and is not available for editing. Simply type the desired
information in the text boxes provided and then OK or Apply the changes.
If you have made changes to the inspection header information you can update
the Inspection object with this information by clicking the Apply button.
The remaining tabs: Channels, WorkPieces, Probes, Defects, Scans
and Materials are used to maintain the lists of items used in the inspection.
The WorkPieces tab is shown in the Figure below, but all the remaining object
tabs look and behave the same way.

Channels tab on the EcInspection control's properties page
The listbox on the left side of the page shows all the objects of the current type contained in the inspection. For example, in the Figure above, there are 3 Channel objects available in this inspection.
Pressing the New button will add a new object to the list. For example, in the
Figure above, the New button was pressed twice adding two new Channel objects:
Channel 2 and Channel 3. The objects will be the default objects.
Press the Add button to add all the objects from another Inspection
to the list of available objects. You cannot add Channel objects though, you
must create new Channel objects from scratch.
If for example, you want to add all the WorkPiece objects from the inspection
Insp01000.xml. If you do not want all the objects, just use the Delete button,
as described below, to delete the undesired objects from the list.
Use the Delete button to delete undesired objects from the Inspection. Simply highlight the desired object for deletion by selecting it in the list, then press the Delete button. For example, in the Figure above, pressing the Delete button would cause the Channel2 object to be removed from the display and the Inspection.
You cannot delete any object that is in use by any channel. For example if
you try to delete "WorkPiece1" , you would get the message:
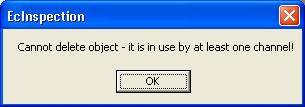
because WorkPiece1 is in use by Channel1. If you are deleting a channel, it must not be the one currently in focus in the Inspection control and cannot be the only remaining Channel object. Channel focus switches to the next available Channel object.
Press the Properties button to open the properties page for the object selected.
See the individual object controls for more details.
Pressing the OK button will attempt to apply any changes you have made and close the properties window. Any errors found will be reported and need to be corrected before the properties window is closed.
The cancel button closes the properties window, losing any changes you may have
made. You will be warned about any changes that will be lost.